How to use Angular i18n with the built in @angular/localize and XLF
In Angular you have the @angular/localize package, which is Angular’s own build in tooling for translations. This will be sufficient in most cases, it takes a few steps but it’s easy to use.
The translations are done through aot compiling, all translations are compiled into the app ahead of time (when building your project). The upside is you have multiple builds of your app which enables different strategies for serving them and best of all: it has great performance. The downside is that it isn’t optimized for dynamic logic, which is possible and I will explore in a later article.
1. Let’s start! Add the localize package
Assuming you have an Angular project already, let’s start with adding the localize package to the project. If you haven’t follow the Angular installation instructions and run ng new your-project-name for a new project (you can replace the project name with a custom one, without using spaces)
Angular’s CLI makes this job very easy:
ng add @angular/localizeMake sure to use a recent version of Angular and the CLI, it will make it a lot easier.
2. Start marking translations
Translating components is done by adding i18n attributes to elements. This can be almost any element, ex. block elements like h1 and p, even inline elements like span.
Format:
<element i18n="{meaning}|{description}@@{id}">Your text</element>

Example:
<h1 i18n="{auth login headline|A warm welcome for the login screen@@authLoginHeadline">Welcome!</h1>
In the example you see the i18n element with a value, this value has three sections:
- meaning: provide info about the meaning and intent
- description: ability to add context or additional information
- id: unique identifier
All parts are all optional. Even the id, if you don’t add one yourself it will be generated each time you export your translation source files in a later step. They will change every time you do this, so it will make maintenance of your translations a bit harder.
It is best to do this on elements that wrap the text. So try not to translate a div containing p elements or an ul containing li elements.
Tip: you can even use a ng-template element when you don’t want any additional DOM-elements, so you don’t have to use span elements if you need a few translations.
3. Generate translation source files
A really satisfying step in the proces. Make the Angular CLI walk through all of your code and find i18n attributes. From that it will generate a translation source file, with all translation sources.
ng extract-i18n --output-path src/localeYou now should have a XLF file in you src/locale directory with a XML structure.
Tip: use npm scripts
Make it easier on yourself, you don’t have to remember this. Open up your package.json file and add a line in the scripts section:
"translate": "ng extract-i18n --output-path src/locale",Now you can just run npm run translate or yarn translate for the same result. That’s a lot easier for future self and your team members.
4. Translate your app
Working with this XLF file is quite hard to do from an editor, especially when you need to merge it with changes later on. That’s why I made a tool called What?!
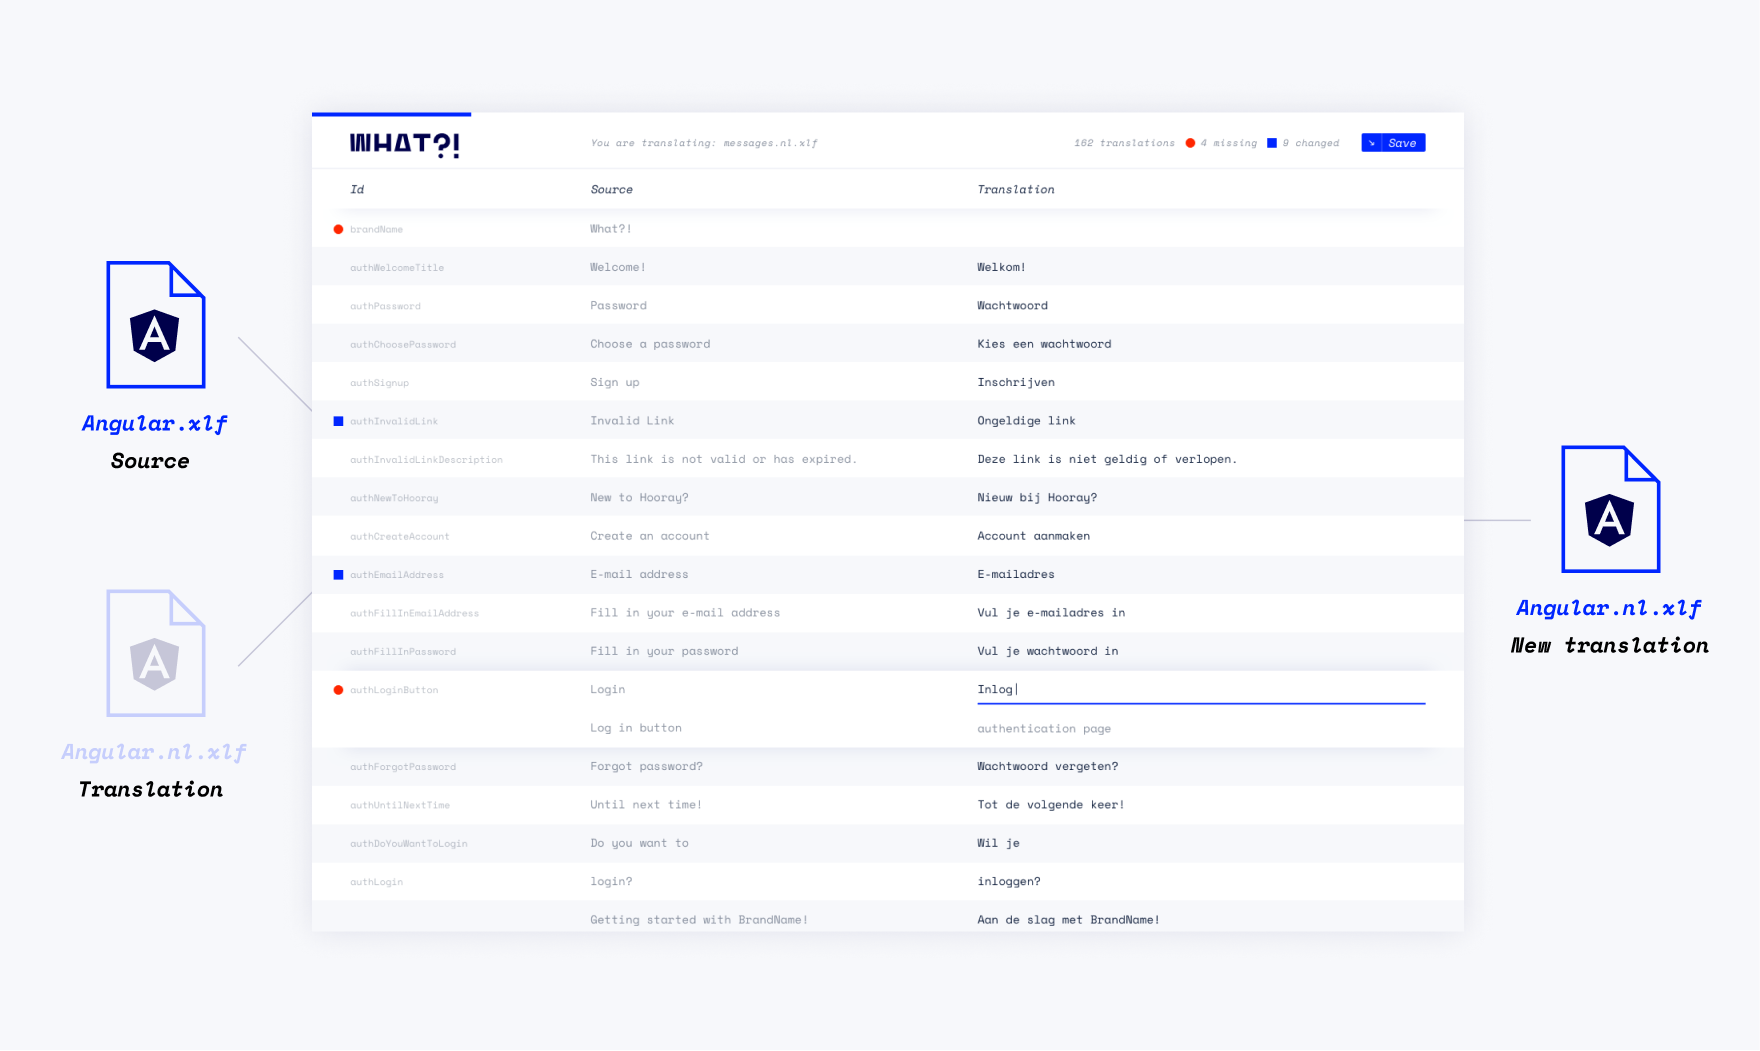
- Open What?!
- Throw in your translation source file
src/locale/messages.xlf - Translate the app to the targetted language
- Press ‘Download’ when you are done and save it to
src/locale/messages.[lang code].xlf(replace lang code with your language code, ex. nl or fr)
Tip: when you have a source and translation file, you can drag in both. It will automatically match the files and you can continue translating your app with ease. You can even see which sources have changed or filter on empty translations.
5. Configuration of Angular
Now we have to do some final configuration to make Angular use the XLF files you just created and compile them into your project in the build process. Open up angular.json in your code editor, you can find it in your project’s root folder.
First we need to add the i18n configuration with the primary (source) language which is used with the text in your components.
Add the following piece of JSON inside your-project-name found in projects, I have put it in between prefix and architect.
"i18n": {
  "sourceLocale": "en-US",
  "locales": {
    "nl": {
      "translation": "src/locale/messages.nl.xlf"
    }
  }
},
Do not forget to change nl in this example, found in the object’s name and filename. Change it to the language code you just translated your app to. You can also change the sourceLocale if you haven’t used English inside your app code.
Now you can use the defined locales inside the build process, add this piece inside configurations above production (the one inside of build).
"nl": {
  "localize": [
    "nl"
  ]
},
The last thing we have to configure, being able to serve the development version of your app while using another language. You can do this inside configurations, this time in serve. Duplicate the development configuration and rename it to the language code you want to use. Add ,[lang] at the end, so it will use the configuration we created before. For example:
"nl": {
  "browserTarget": "project-name:build:development,nl"
},
If you copied the snippet above, do not forget to replace the project-name with yours and language code (in both places).
6. Party time!
We now have generated language files, translated them and configured Angular to use those. Let’s check out the end result!
Production build
To make a build you can just use ng build or npm run build, just like before. You will notice a little difference inside the dist folder, there is one build per language.
Serve development
Run ng serve --configuration=nl to serve your app, of course replace the language code with the one you used.
Tip: you don’t want to type this every time, at leas I don’t. It’s easier to make some npm scripts inside package.json like before:
"start": "npm run start:nl",
"start:nl": "ng serve --configuration=nl",
"start:en": "ng serve",
So you can just run npm start or yarn start for the Dutch version in this case, or npm run start:en (yarn start:en) for the English one. A lot easier.
What’s next?
That’s it, you now have a multi language Angular app! From now on you can continue working on your app, just repeat steps 2, 3 and 4. Making sure to mark all text in new components and generate new source files.
Like I mentioned before, with a tool like What?! you can throw in your new source file and your existing translations. It will automatically merge them and show any changes. You can work through them and add any new translations as well. You only have to check changes, translate additions and include the result in your project. You are ready to build and launch!
Tip: do a walkthrough or PR review to make sure all text is going through the translation process.
That’s it!
This is all you need to get started with the Angular i18n module, there is a lot more to tell. You can follow me on Medium, Dev.to or Twitter for new articles.
Any questions or feedback? Just hit me up on Twitter!